Sunday, 27 November 2011

Haneesa: Blog Promo for 'Le Beau Monde'

Hi guys!

Today I won't be posting a tutorial or any DIY projects, but I will be introducing to you a friend of mine :) who runs an awesome blog shop called 

Le Beau Monde 
or as I like to call it
my accessories heaven *_* 

Rozana Razali (or more famously known as Zana) is a course mate of mine, and not only is she super nice and soft spoken, she is also the owner of this adorable shop which has tons of amazing accessories & beauty products. Honestly speaking, her blog shop is pretty unique.. and this is coming from a person who browses blog shops, like, 5 hours a day ok. (yes, I can get pretty carried away)

Screen prints of www.lebeaumonde.co.cc ♥


Her blog has so many different accessories to choose from which will make you go nuts, especially if you are into Korean fashion.
I'm going to let you in a small secret; I once found a picture of ring that I really wanted but was so hard to find so I requested it from Zana, and guess what? She got it for me! I really didn't mind paying for it more, but I was given the normal price which, let me tell you, is pretty cheap. This also brings me to another best selling point about her shop. 

All the accessories are super affordable.

I've seen some shops selling the same accessories for like, five times the price. Let me ask you: why should you pay more for the exact same item? All I know is I'm in for the best deals in town. Plus, I'm super satisfied with the stuff I've bought. So far I have three rings and a necklace, and I have this one ring that people always compliment me on :) Here's a photo of it:

My ring is the one on the far right. A white rose on a pink bow is just too adorable to resist >.<

Hold on. I just remembered, I got a pair of earrings and an owl ring from her too. LOL. I can't keep track anymore. All of our friends know about her shop and its about the only place we go for Korean accessories. 

So...if you are looking for an alternative website for accessories, beauty products and even some pretty clothes, you must visit www.lebeaumonde.co.cc. Like I mentioned, its got a super massive amount of stuff you can choose from with the best prices. Before I sign off, let me show you the stuff I'm eyeing for at the moment...

You can also visit her facebook page here ♥ 
Aren't the pink and light blue rings absolutely gorgeous? *_*
Have fun shopping guys! Don't forget to like her on Facebook too!


All images on this post are credited to the Zana'z website http://www.lebeaumonde.co.cc/

Wednesday, 23 November 2011

Far: Hijab tutorial! Neat Arab ghutra look! Great with glasses too!


Salam ladies! Here's another tutorial for you girls:)

Note: this look is short and it does not cover the chest. I'm wearing a top with with a sort of add on vest that already covers the chest. So keep in mind that this style has to be worn with a loose top or vest that covers the chest.

This is also good for girls who wear glasses and hate the fact that the sides of their hijab stick out. I am wearing big frame glasses and no worries here!

Ok, here we go!


 As usual one side long and one side short.


Take the two sides like so, don't forget to slightly fold it in.


Bring it to the side and pin!

The other side!


Take the long side...


Bring it under the shorter side...


and around to the other side and hide under the fold. Pin to secure!


Tada! Easy peasy! Hope you girls love it! If you have any request, please feel free to comment! And I will come up with something, if you have any questions or style tips let us know!


Friday, 18 November 2011

Haneesa: Fabric Book Cover


I’m going to let you in on a secret of mine.

I hated my school

and although I never understand why there are people who love going and afterwards want to go back to school,
I'm just going to say that that's OK too.

Image courtesy of ewhogan.edu.au

I don't mean to be all emotional but it really isn't my fault that I didn't like school so much :( Why did it have to be so systematic, rigid and most of all, biased? And it was so confusing because I liked my subjects and I liked learning new stuff but I couldn't stand the lessons! They were so.... controlled. Plus here in Malaysia everyone only looks at your grades, and never your skills. Back in school, I never felt like my thoughts and ideas (basically my own brain) were important- the only way to learn was through books.

Don't get me wrong though; I love books... and I still miss some of my teachers and friends. However school was still torturous, so I expressed my thoughts and feelings through stuff like arts & crafts, writing and music. Thankfully as I got older I also found that religion gave me a lot of room to expand and express my ideas.
So for this post, I'm going to show you a way you can make your school life a little more endurable enjoyable or if you already like school, something to get your creativity going J.
~

First things first; you will need several materials and tools for this fabric book cover. They are:

♥ Notebook
For this project, I am using a spiral bound notebook, but I think any kind of notebook works just as fine
♥ Fabric
I got mine at Daiso, which was precut to 70cm x 100 cm. They have two kinds of materials; polyester and cotton, which comes in many pretty patterns :)
♥ Scissors
♥ Fabric Ribbon
♥ Needle, thread, pins
♥ Long ruler and pencil

Step 1
Take your notebook and lay it out open. Measure the full length and width in inches. Also, measure the length of the front cover  - this should be about half the full length of the notebook.
          
Full Length
Width


Take these measurements, and follow this formula to start cutting out your fabric:
(a)   Full length + 1 ¼ inches
(b)   Front cover length-  ½ inch
(c)    Width + ½ inch

This is an example of the measurements from my notebook
(a) 12 inches + 1 ¼ inches =
13 
¼ inches
(b) 6 inches - ½ inch =
5
 ½ inches
(c) 8 ½ inches + ½ inch =
9 inches

Step 2
Now, you will be cutting three pieces from your fabric.
First, take measurements (a) and (c) and draw them out on the wrong side of your fabric. This will be your outer piece.
Next, take measurements (b) and (c) and draw them out also. Remember to make two of these pieces. These two will be your inner pieces.
Cut them all out.

Top: Outer piece. Bottom: Inner pieces.
You can use a measuring tape for this step... though a ruler makes life much so easier!
                       
Step 3
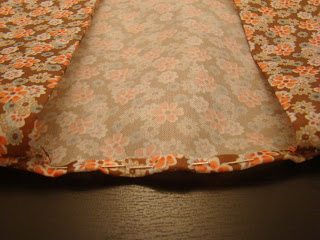
Take the two inner pieces and turn them wrong side up. Fold in one side over ¼ inch and pin them down. Press/iron to keep in place. Do this on both pieces of fabric.

Fold one side inwards, then pin to secure...
...and for a closer look :)

Step 4
Take the outer piece and lay it right side up. Take the two previous pieces, lay them on each ends of the outer piece, pin to hold, then sew them on. Remember not to sew the side that you folded earlier!
In this step, I used a back stitch, instead of a regular running stitch, for extra strength.

Back stitching; at the front here the stitching looks like dashes. At the back, it looks like one single line.

Wrong sides to stitch!

Correcto mondo!
End product :)


Step 5
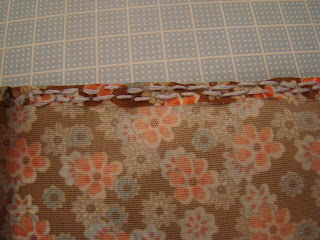
Turn your book cover right side out. Pin the top and bottom edges of the outer cover, then press to hold them down. Sew these edges to keep them in place.
For this step, I used a zigzag stitch to create nicer patterned look.
 
Pinning them together

More pins..

Zigzag stitching from behind

Zigzag stitching from the front

Looks like this after its all done

Step 6
At this point your fabric book cover is already finished J
However, you can also add a ribbon to secure your book. 
To do so, open up your book cover and measure the middle of the full length and the middle of the width. This will give you the centre point of your book cover.


To measure the length of the ribbon, take the measurement of the full length of your book and add another 16 inches. This will ensure that your ribbon can be tied. Cut the ribbon.
Now, measure the width of your ribbon. Mark this width on the centre point of your book cover.

Ribbon with a 1cm width

Stitch an ‘X’ about the size of your ribbon width.
         
Mark the 1cm width on this centre point

How it looks like on the front
Turn your book cover around and insert the ribbon.


And now your fabric book cover is finished! You can adjust the ribbon so that it sits either on the spine, opening or front of your book. If you guys face any problems, you can have a look at this tutorial . This book cover can even be used for personal stuff like diaries, journals and the like. It not only makes a good protection for your book, it looks absolutely gorgeous too! I hope it makes your school days more enjoyable J Take care everyone!


Thursday, 10 November 2011

Aiysha: Cupcake rose bouquet

Hi! A few weeks ago, a good friend of mine had asked for a bouqet of rose cupcakes! (Similar to the ones you'll see in my first post). She needs them for her hantaran (part of a traditional wedding gift). So what you will be seeing here is a trial run for her! These bouqets are great as gifts or is just another pretty alternative.

Seeing that her theme is soft pink and green, I came up with these uber sweet colours.


With long kebab/satay sticks, I arranged my cupcakes as seen below. They are fixed into a styrofoam cube which is covered with Ritz cracker crumbs.


Then from the middle, move outwards in a circular motion. You will have some difficulty at first, but you will get the hang of it :)


I went on with the other cupcakes with other colour icing like so..


Here's the overall look!


Hope you guys like it! Will be posting on new creations soon!

Sunday, 6 November 2011

Far: My Hijab Story

Salam and hello all!

I wanted to take this time to post something a little special. Today marks the day I have been wearing the hijab for a whole year! I know the hijab is a wajib (compulsory) act of faith for all women as they come of age, but I only had the courage to don one a year ago. It is the best decision I have made in my life! I would like to tell you my hijab story.

For many years, wanting to wear the hijab had been gnawing at my heart, but I had brushed it away with many excuses. I was afraid that I would be ridiculed by my family, abused by strangers in Melbourne. I was particularly afraid of the prejudice I would face in my classes and those around me who have had only media skewed images of Islam and the hijab. However my perceptions were far from the truth.

Though I faced some opposition at first primarily from those close around me, I realized that my friends, especially my non muslim friends were supportive, understanding and thrilled! My classes went on as normal, and though I had to work twice as hard to overcome prejudice, it only benefited me in the end! My grades are testimony to that :) I also realized that men stared at me less and I felt more comfortable in my own skin. I no longer felt the need to be skinny or sexy, or to push myself to be someone  I was not.

These are all the superficial pros to wearing the hijab. The primary goal of me wearing the hijab was to please God. Wearing the hijab did not make me feel more religious, neither did it make me feel that I understood my religion better. It did not give me a 'head's up' to non hijabi sisters. I was still the same ol' crazy Far. However it gives me peace of mind that I am doing something that pleases God. I may not be perfect in my dress, but I am still learning and will do better each day insyaallah..

So what is you story? and how does your hijab make you feel? leave me a comment!

ps: My hijab do for Hari Raya Haji

Related Posts Plugin for WordPress, Blogger...